DIY Steel Building Kit Assembly Process
Build it Yourself and Save!
At Worldwide Steel Buildings, we believe in putting the power of creation into your hands. Our steel building kits have been meticulously designed with the do-it-yourselfer in mind, offering a seamless assembly process that empowers you to bring your vision to life, one bolt at a time.
Unleash your inner builder with the assurance of quality that only Worldwide Steel Buildings can deliver. Our DIY metal building kits are more than just materials – they’re the key to unlocking your potential as a builder, a creator, and a visionary. With each piece pre-punched and precision-engineered, our steel building kits effortlessly come together, truss by truss, eave by eave.
Crafted right here in the USA, our steel frames are a testament to American craftsmanship and ingenuity. Whether you’re looking to build a versatile metal garage, a resilient storage space, or a charming metal barn, our building systems provide the foundation for your dreams, designed to withstand the harshest weather conditions and the test of time.
Our steel building kits allow you various customization options, from the roof style to the wall panels, ensuring that your structure aligns perfectly with your unique vision.
When you choose Worldwide Steel Buildings, you choose more than just a DIY metal building kit – you choose a promise. A promise of exceptional quality, cost-effective solutions, and a warranty that reflects our confidence in every component. From carports to garages, RV covers to barndominiums, our DIY steel building kits allow you the flexibility to create the custom metal building of your dreams.
With each kit, we provide a comprehensive step-by-step assembly manual, guiding you through the entire construction process, from the initial truss to the final roofing panel. Should you ever need assistance, our dedicated building specialists are just a call away, ready to provide the support you need to transform your prefab dream into a steel reality. Elevate your building project, defy the elements, and embrace your role as a do-it-yourselfer. Get your free quote today and embark on a journey of limitless building design possibilities.
Read below for a step-by-step review and testimonial.
Example DIY Project
What follows is a customer testimonial regarding their experience with assembling one of our steel building kits. Continue reading to learn just how easy it was for one of our customers to actually do it themselves!
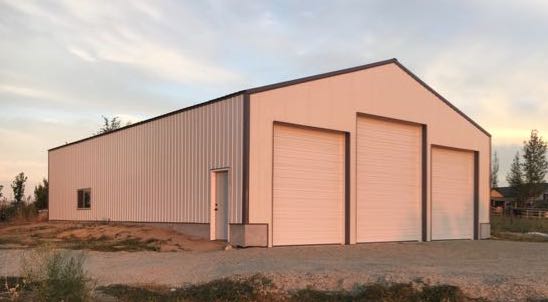
Overview
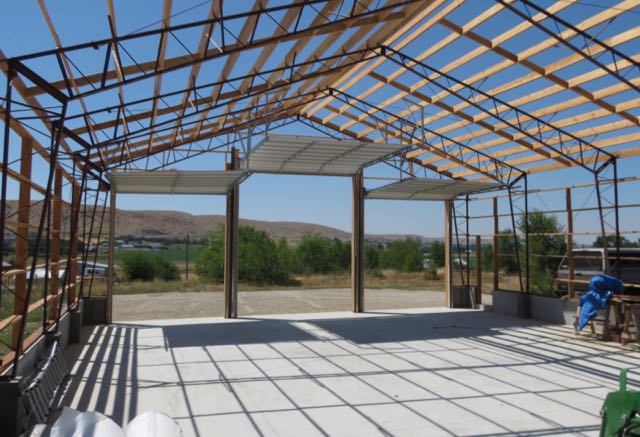
“This project is an unheated steel workshop and storage building. The side walls are 12-feet on a 2-foot pony wall. The front elevation is 14-feet from the ground to the eaves. There are three overhead doors: two are 10-feet wide x 12-feet high the other is 12-feet wide x 14-feet high.”
“I chose Worldwide Steel Buildings for a number of reasons. The company was very responsive throughout the selection process. Price, although not the lowest cost, was competitive. Their building design is practical, adequate, but not over-engineered. I wanted to avoid hiring any help. There are only a few steps in this building assembly that require a second person. No special skills are needed. There isn’t any welding, and it can be assembled using common construction tools. I was not disappointed with this decision.”
Material Delivery
“The material quantities delivered were good. My delivery was short of one 12-foot polycarbonate panel, but I received extra metal panels from Worldwide Steel Buildings, so I came out ahead. (In fact, I ended up with enough extra metal to place siding on a 10 x 14 garden shed.) Fastener quantities were ample, and I had a surplus at the end.”
“Material quality was also good. The only minor exception was the wind bracing rod, as noted below. All matching fastener holes aligned with no modifications needed.”
“Although plans were clear and complete, I had a few questions during the construction of my metal workshop. The Worldwide Steel staff was easy to reach and responded quickly to my questions.”
Pouring the Foundation
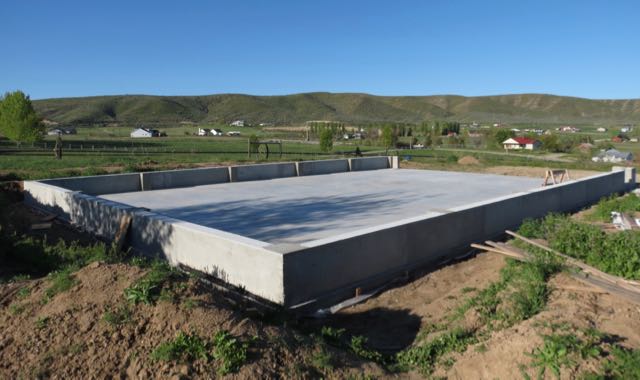
“I started with a solid concrete foundation. Perhaps it was overkill, but I brought each truss pad to precise grade with thinset grout.”
“Anchor bolts need to be precisely placed, so I did not set conventional J-bolts into the wet cement. Instead I drilled and epoxied Allthread after the concrete was set. Pilot holes were drilled in scrap plywood at the exact anchor points to guide and support the rotary hammer bit, then that same plywood template was used to hold the anchor bolts in place as the epoxy was setting.”
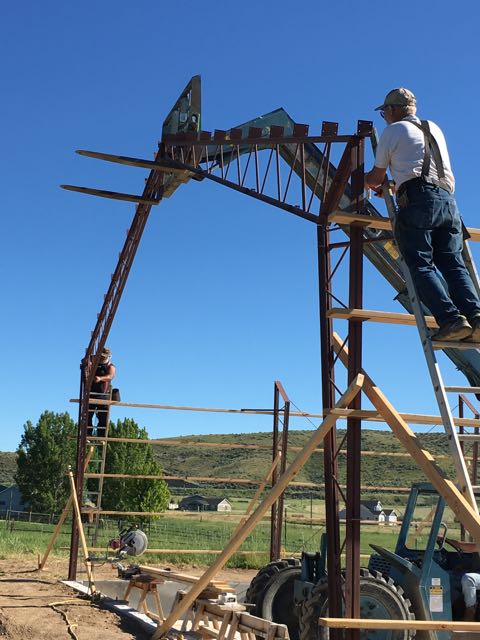
Erecting the Steel Frame
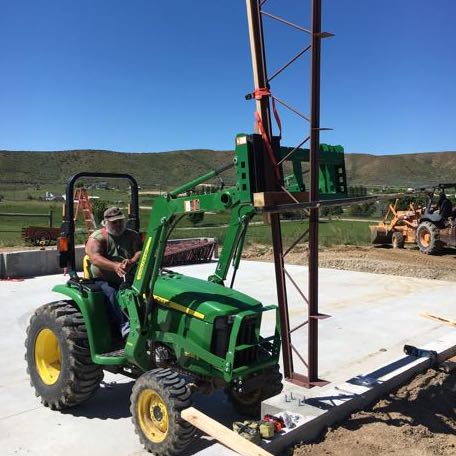
“When it was time to erect the steel, I had help from a friend. The columns were a bit heavy and bulky to set by hand, so we used a tractor.”
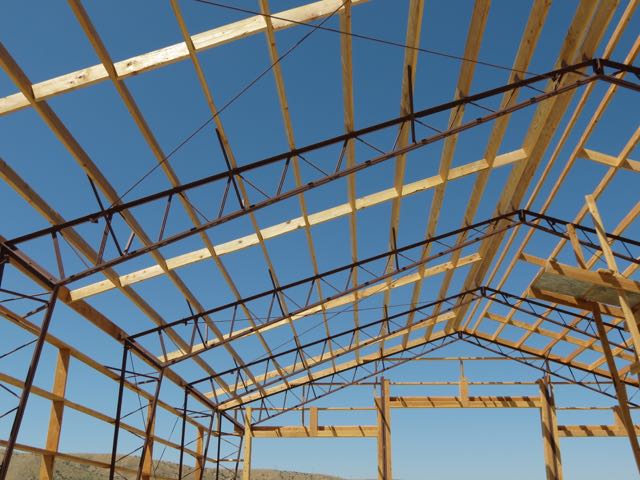
“16-foot 2x4s were used for temporary bracing. Initially, we were unable to find the wind bracing rods in the material pile, so we used nylon cargo straps as a temporary solution. Shortly thereafter we found the wind bracing rods nested inside the roof trusses. A chop saw was used to trim the girts and purlins to exactly 12’ – 0”. I overlooked that the end purlins need to be cut 1-1/2” shorter, so I had to trim those in place after they were erected. I set up temporary scaffolding on a tandem axle trailer.”
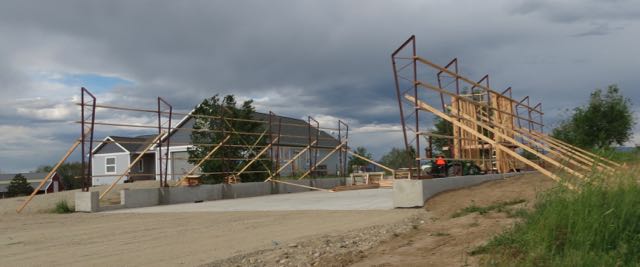
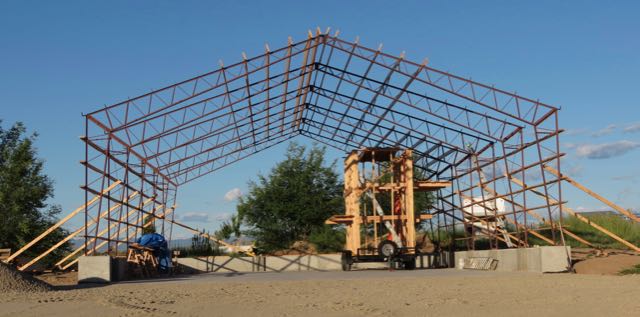
Erecting the Trusses
“Erecting the trusses was definitely not a solo operation. While the trusses were only a few hundred pounds, it would have been very difficult to erect them without additional help and equipment. My friend and I used a Gradall, and all six trusses were bolted in place in less than three hours. While the Gradall was on site, I also used it to place a row of temporary purlins near the peak. This would have been difficult to accomplish without the equipment.”
“Next I placed the permanent purlins. The moveable scaffolding was handy during this step of the metal building construction.”
“The only quality control issue that I found in this steel building package was with the wind bracing rods. The threads were poorly cut poorly leaving gaps on the rods. However, the way the rods are installed allowed me to position the nuts on the good portion of the threads. This is one of the few areas where the plans could be improved as there isn’t good guidance on how tight to place the nuts. It would be nice to have clean threads and minimum torque specs.”
“Constructing this steel building solo, most purlins were not a problem because they sat on the trusses and the anchor plates and were held in place by gravity while being bolted down. However, the bottom (outboard) purlin has nothing to sit on while it is being bolted in place. So I temporarily screwed notched 2x4s on the ends to hook on the anchor plates while bolting the bottom purlin.”
“After the girts and purlins were in place, it became apparent that our hot Idaho sun during a record heat wave was not being nice to the exposed wood. A downside to constructing my steel building solo is that it took longer, giving the wood more time to twist and bow in the heat. It was so bad that gang drilling the panels would have been impractical. So I ended up placing blocking at the midpoint of all girts and purlins to straighten them out.”
“Looking at the framed structure, I recommend placing blocking on the purlins as an added structural benefit, even if the wood doesn’t bow or twist.”
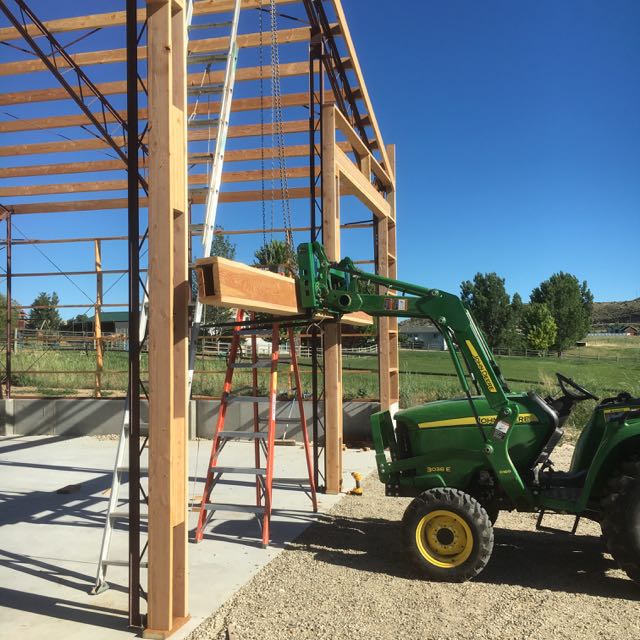
“The end columns were too heavy for me to lift into place, so I used a forklift and chain hoist. At the rear of the building I used a 4-foot level to plumb the columns, but that was a mistake because it wasn’t accurate enough and I had to re-adjust later. Instead, I should have used a plumb bob.”
Framing and Installing Overhead Doors
Installing Siding
“Once the overhead door headers and the overhead doors were installed, I was ready to install the siding. As recommended in the construction plans, it is best to pre-drill the panels. The problem I’ve experienced with pre-drilling in the past is that when you drill more than a few panels at a time, the 1/8-inch drill bit drifts badly on the lower sheets. For this project, I made a jig to hold the bit. That prevented me from having to mark each line while also holding the bit nice and straight. Limit gang drilling to six sheets, but doing so is a major time saver.”
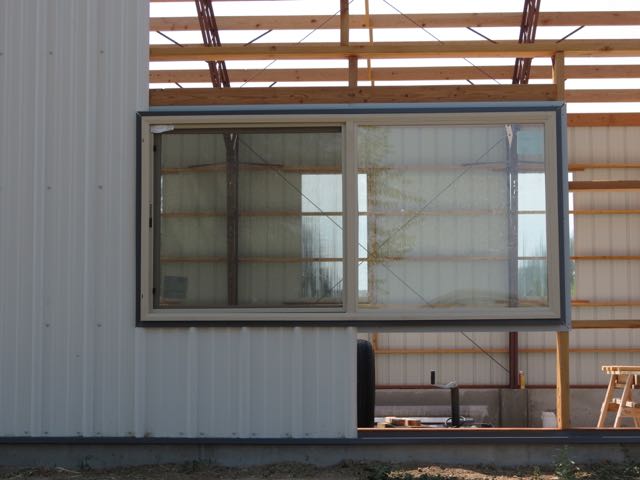
“I framed the windows and man doors to match the spacing of the 3-foot wide panels. That made cutting the panels around those openings easier and saved a significant amount of panel material that I will repurpose later on another project.”
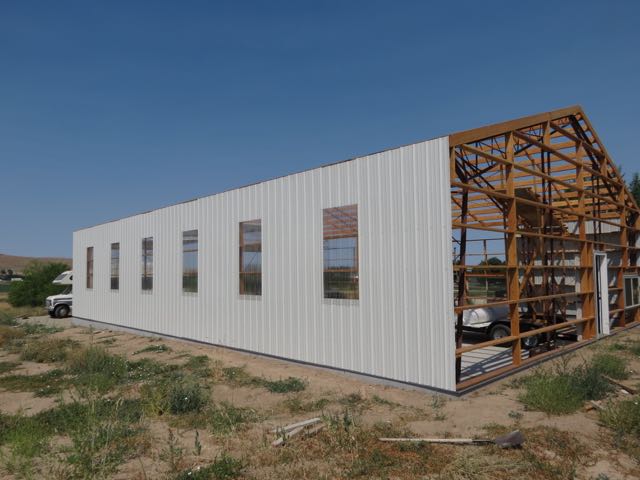
“The polycarbonate panels on the south wall will allow natural light inside an otherwise dark man cave. The only material shortage I experienced with this order was a 12-foot poly panel, but The Home Depot has similar panels that match the rib pattern on the 3-foot-wide siding. Unfortunately, Home Depot’s panels are only 8-feet long, but other than that, they work just fine.”
“One glitch I experienced as I started to install the panels was that I placed the closure strips against the trim without measuring. The sticky backing on the strips doesn’t allow for movement once they’ve been placed, and the strip length doesn’t quite match the panel ribs. Being offset, they were useless at best. I learned to pre-mark the rib locations and then force the foam strips to match the marks.”
Roofing the Workshop
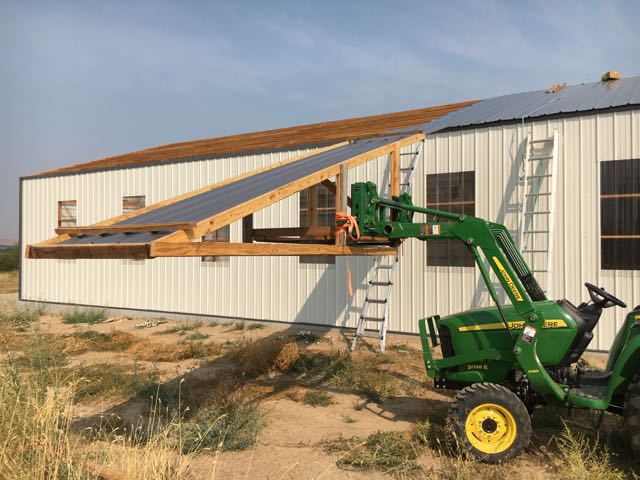
“Once the wall panels were up, it was time for roofing. The biggest challenge in roofing this metal workshop was how to get 21-foot-long metal panels into place without bending or damaging them. I built a sloped rack for the tractor with a 4:12 pitch to match the roof and then lifted them high enough to slide into place.”
“Although it was not included in the design plans, I chose to place a layer of EcoFoil bubble insulation between the purlins and the roofing to minimize (and hopefully prevent) condensation from collecting on the metal panels and dripping onto equipment below.”
“EcoFoil should be placed with a 3/4-inch sag between each pair of purlins to provide an air gap. It was not difficult to add the insulation, but it did add significant time to the roofing placement. Plus, the reflective insulation wanted to flop around in even the slightest breeze, so at times I had to temporarily hold it down with 2x2s until the roofing was slid into place. I used the Double Bubble EcoFoil insulation which is about 1/4-inch thick. The foil side should face the metal.”
“And finally the ridge cap — the last component — is installed. I deviated from the plans and omitted the closure strip between the ridge cap and roofing to provide a continuous open ridge vent. Hopefully that will assist in controlling the condensation.”

Final Thoughts
“It took about four months to construct my metal workshop, from material delivery to placing the ridge cap. However, we were experiencing a record-breaking extremely hot summer during construction, and I was only able to work in the mornings. Plus, this was one of several “honey do” projects on my list for the summer. Most of this work was done solo by a slow, tired, over-the-hill, out-of-shape, 73-year-old. If I can do it, anybody can!”
“Most online reviews ask customers to rate companies by assigning one to five stars. I would definitely give Worldwide Steel Buildings five stars. Their customer service was great. The material quality was excellent with one minor exception. The building package was complete and included everything I needed with only one minor glitch. It was easy to construct. The price was reasonable, and the finished workshop turned out well.”
“Would I recommend Worldwide Steel Buildings to others? Yes.
Dick L.
Will I build another steel workshop? Nope, I’m too old and tired. Time to go fishing!”
Emmett, Idaho
Want to Build Your Own Steel Building?
Contact our friendly steel building specialists to get started on your own DIY steel building project.